
Pardon my absence these past few days...with the hectic-ness of getting the house ready, hosting Thanksgiving, and the mad clean up and a small bout of the flu thrown in there, I must admit, much sewing has not been done! At last, I have finished writing up the pattern/tutorial for the simply squares/Lions and Tigers and Bears Oh My! quilt!! This is my first attempt, so bear with me, but here goes!
Simply Squares Quilt Pattern
Simply Squares Quilt Pattern
Fabric Requirements
Quilt Top
Fabric A (Focus Fabric) : 1 yard
Fabric B: 1/2 yard fabric
Fabric C: 1/2 yard fabric
Fabric D: 1/2 yd fabric
Fabric E: 1/2 yd fabric
Fabric F: fat quarter (you will use just about every bit)
Fabric G: fat quarter (you will use just about every bit)
Quilt Back
Solid H: 2 yards solid fabric
Solid J: 1 yard (if you don’t mind a seam through the middle of your smaller solid piece on the back) or 2 yards (this will allow for enough width to avoid a seam through your smaller solid piece on the back)
Pieced Portion: You will need an assortment of different height fabric scraps(total length needs to be 55 inches) that are featured on your quilt top that measure 8 1/2 inches wide.
Block Design
Block 1
- 10 1/2 x 10 1/2 inch square (You will be making 8 block #1s)

Block 2
- (4) 5 1/2 X 5 1/2 inch blocks sewn together to make (1) 10 1/2 x 10 1/2 inch block (You will be making 6 block #2s)

Block 3
- 6 1/2 x 6 1/2 inch block inside of 10 1/2 x 10 1/2 inch block (you will be making 7 block #3s)

Block 4
- (4) 3 1/2 x 3 1/2 inch block inside of 5 1/2 X 5 1/2 inch block sewn together to make (1) 10 1/2 x 10 1/2 inch block (you will be making 4 block #4s)

Cutting Instructions
Fabric A (Focus fabric)
- Cut (8) 10 1/2 x 10 1/2 inch squares. Set aside, label Block 1.

Fabric B
- From your 1/2 yard of fabric (with fabric folded in half, width wise, or selvage to selvage), cut 2 5 1/2 inch strips. Cross cut cut each strip 3 times, so you have (6) 5 1/2 squares from each strip, for a total of (12) 5 1/2 inch squares. Set aside, label fabric B, block 2. (Please note, below diagram is not drawn to scale)

Fabric C
- From your 1/2 yard fabric (with fabric folded in half width wise, or selvage to selvage), cut 2 5 1/2 inch strips. Cross cut each strip 3 times, so you have (6) 5 1/2 inch squares from each strip, for a total of (12) 5 1/2 inch squares. Set aside, label fabric C, block 2. (Please note, below diagram is not drawn to scale)
- Your cut fabric for block 2 should look like this:

Fabric D
- From your 1/2 yard fabric (with fabric folded in half width wise, or selvedge to selvedge), cut 2 6 1/2 inch strips. Cross cut (1) 6 1/2 strip three times, so you have (6) 6 1/2 inch blocks. Cross cut the second 6 1/2 inch strip once. You will have a total of (8) 6 1/2 inch squares. You will only need (7) total 6 1/2 inch blocks. Set aside (7) 6 1/2 squares, label fabric D, block 3.

Fabric E
- From your 1/2 yard fabric (with fabric folded in half width wise, or selvedge to selvedge), cut (7) 2 1/2 inch strips. From (2) of the strips, cross cut (3) 6 1/2 inch strips. From (1) 2 1/2 inch strip, cross (1) 6 1/2 inch strip. You should have a total of (18) 2 1/2 x 6 1/2 inch strips. You will need 14 of these. Set aside (14) 2 1/2 x 6 1/2 inch strips
- From (4) of the 2 1/2 inch strips, cross cut (2) 10 1/2 inch strips. You should have (16) 10 1/2 x 2 1/2 inch strips. You will only need 14 of these. Set aside (14) 10 1/2 x 2 1/2 inch strips and label fabric E block 3.

- Your cut fabric for block 3 should look like this:

Fabric F
- **Please note, you will use every bit of your fat quarter, there is no room for cutting error!**
- Align your fat quarter as pictured below. Cut (2) 3 1/2 inch strips. Sub cut the 2 strips, cross cut (4) 3 1/2 inch squares. You should have a total of (8) 3 1/2 inch squares. Set aside, label block 4.
- From the rest of your fat quarter, cut (9) 1 1/2 inch strips. From (3) of the 1 1/2 inch strips, cross cut (5) 3 1/2 inch strips.
- From (1) of the 1 1/2 inch strips, cross cut (1) 3 1/2 inch strip and (1) 5 1/2 inch strip.
- From the remaining (5) 1 1/2 inch strips, cross cut (3) 5 1/2 inch strips.
- You should have total of (16) 3 1/2 inch strips and (16) 5 1/2 inch strips. Set aside, label fabric F block 4.

Fabric G
- (Same cutting instructions as Fabric F)
- **Please note, you will use every bit of your fat quarter, there is no room for cutting error!**
- Align your fat quarter as pictured below. Cut (2) 3 1/2 inch strips. Sub cut the 2 strips, cross cut (4) 3 1/2 inch squares. You should have a total of (8) 3 1/2 inch squares. Set aside, label block 4.
- From the rest of your fat quarter, cut (9) 1 1/2 inch strips. From (3) of the 1 1/2 inch strips, cross cut (5) 3 1/2 inch strips.
- From (1) of the 1 1/2 inch strips, cross cut (1) 3 1/2 inch strip and (1) 5 1/2 inch strip.
- From the remaining (5) 1 1/2 inch strips, cross cut (3) 5 1/2 inch strips.
- You should have total of (16) 3 1/2 inch strips and (16) 5 1/2 inch strips. Set aside, label fabric G block 4.
- Your cut fabric for block #4 should look like this:

Block Assembly
Assembling Block 1
- This block is easy-peasy! Your 10 1/2 inch fabric square is your block! Set aside labeled Block 1

Assembling Block 2
- Take (1) 5 1/2 inch square of fabric B and (1) 5 1/2 inch square of fabric C. Sew together, right sides facing using a 1/4 inch inseam. Press seams open. Repeat until you have 12 sets of (1) fabric B square and (1) fabric C square sewn together with seams pressed open.

- Take (2) sets of sewn together fabric B’s and C’s. Align seams together so that (1) fabric B square is on top of (1) fabric C square, right sides should be facing each other. Sew the two blocks together using 1/4 inch seam, and press seams open. Finished Block 2 should look like this:

- You should have (6) 10 1/2 inch squares. Set these aside, labeled block 2.
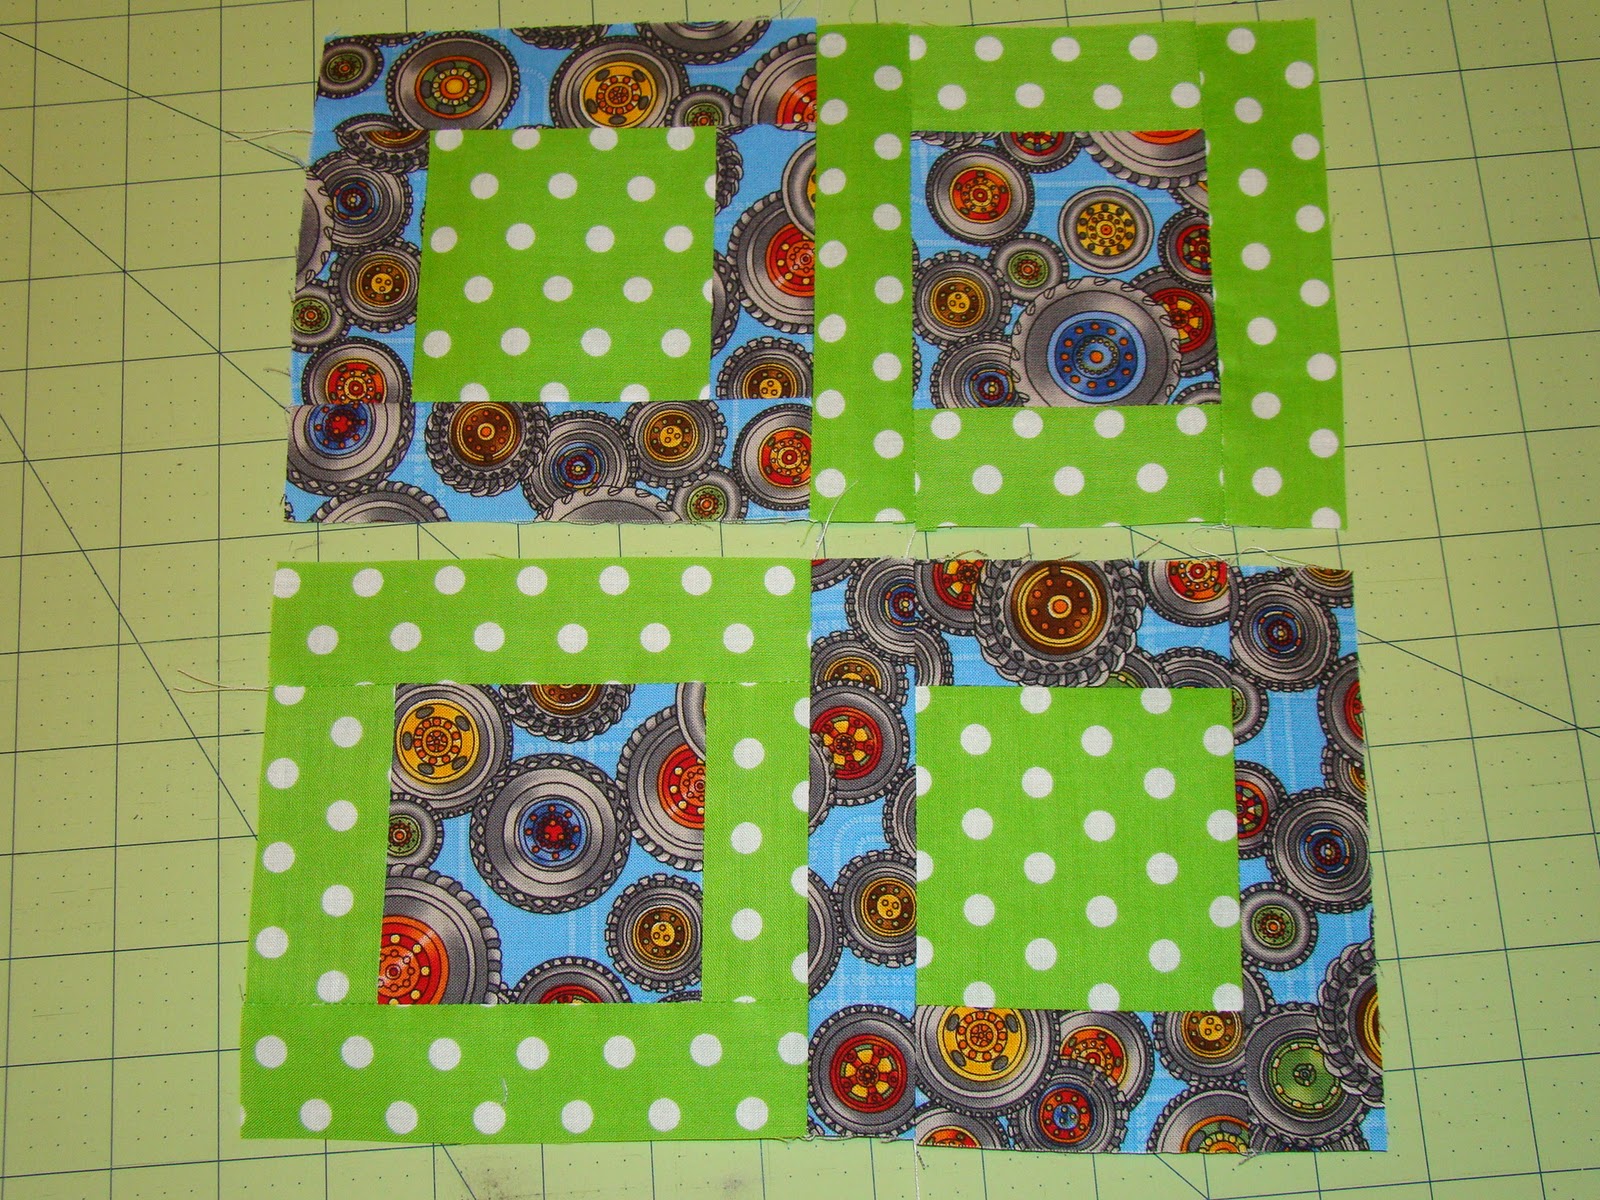
Assembling Block 3
- Take (1) 6 1/2 square of fabric D, and (2) 6 1/2 x 2 1/2 inch strips. Sew the (2) 6 1/2 x 2 1/2 inch strip onto opposite ends of the 6 1/2 inch square using a 1/4 inch inseam. Press seam open.

- Take (2) 10 1/2 x 2 1/2 inch strips of fabric D. Sew the (2) 10 1/2 x 2 1/2 inch strips onto each long side (the side that has an exposed edge of your 6 1/2 inch square) using a 1/4 inch inseam, press open. You should now have a 10 1/2 inch finished square-in-square style block. Finished Block 3 should look like this:

- You should have (7) 10 1/2 inch squares. Set these aside, labeled block 3.
Assembling Block 4
- To assemble block 4, you will essentially be making (4) smaller scale block #3s and sewing them together to make a finished 10 1/2 inch block.
- Take (2) 3 1/2 inch squares of fabric F and (4) 3 1/2 x 1 1/2 inch strips of fabric G. Sew (2) 3 1/2 x 1 1/2 inch strips onto opposite ends of each 3 1/2 inch square using a 1/4 inch inseam. Press seam open.

- Take (4) 5 1/2 x 1 1/2 inch strips of fabric G. Sew (2) 5 1/2 x 1 1/2 inch strips onto each long side (the side that has an exposed edge of your 3 1/2 inch square) using a 1/4 inch inseam, press open.

- Now, Take (2) 3 1/2 inch squares of fabric G and (4) 3 1/2 x 1 1/2 inch strips of fabric F. Sew (2) 3 1/2 x 1 1/2 inch strips onto opposite ends of each 3 1/2 inch square using a 1/4 inch inseam. Press seam open.
- Take (4) 5 1/2 x 1 1/2 inch strips of fabric F. Sew (2) 5 1/2 x 1 1/2 inch strips onto each long side (the side that has an exposed edge of your 3 1/2 inch square) using a 1/4 inch inseam, press open.
- You should now have (4) 5 1/2 inch square-in-square style blocks, (2) with fabric F as the center fabric, and 2 with fabric G as the center.
- We will finish this block in a similar manner to block #2.
- Pair (1) 5 1/2 inch block with fabric F as the center with (1) 5 1/2 inch block with fabric G as the center. Sew each set together, right sides facing using a 1/4 inch inseam. Press seams open.
- Take (2) sets of sewn together blocks. Align seams together so that (1) fabric F centered square is on top of (1) fabric G centered square, right sides should be facing each other. Sew the two blocks together using 1/4 inch seam, and press seams open. Your finished block should look like this:

- You should have 4 completed 10 1/2 inch blocks. Set aside, labeled block #4.
Assembling your quilt top
- Now that all the blocks are constructed, it’s time to assemble your quilt top. Using the below diagram as a guide, place your completed blocks on a design wall or floor space.
- Sew blocks together, row by row, using 1/4 inch seams and press seams open, until you have 5 rows consisting of 5 blocks per row.
- Now sew each row together, again using 1/4 inch seams and pressing seams open.
- Ta-Da! You should now have a completed quilt top that measures 50 inches x 50 inches.
Assembling your Quilt Back
- Sew your assortment of 8 1/2 inch wide fabric scraps featured on your quilt top together, right sides together using a 1/4 inch inseam until you have a length of 55 inches. Press seams open.
- Take your 2 yard piece of solid fabric and cut to 35 1/2 inches x 55 inches.
- Take your 1 or 2 yard piece of solid fabric for the smaller part of your solid quilt back. You need the total size to be 13 1/2 x 55 inches. Again, if using a 2 yard cut of fabric, you will have enough to avoid a seam through the middle of your sold. If you decide you don’t mind the seam, cut your 1 yard piece of fabric, so you have (2) 1 yard x 21-22 inch pieces of fabric. Sew these together so you have one long 2 yard x 21-22 inch piece of solid fabric. Cut this so that it measures 13 1/2 x 55 inches.
Wow! You're very own pattern! Congratulations!!! Can't wait to try it!
ReplyDelete"Your very own pattern."
ReplyDeleteI would love to see a photo of how these blocks fit together, if you have one! Thanks!
ReplyDeleteWould you publish a drawing of how the back is pieced. Instructions are not clear.
ReplyDelete